
Recover your guard like a world champion black belt and make fighting out of side control a thing of the past!
Let’s face it. There’s nothing more frightening than knowing your guard is just about to be passed.
When you’ve spent all weekend researching and drilling that killer new sweep, only to get to the gym and have a meathead athletic guard passer throw your legs to the side and dive down on you with a Rob Van Damme 5-star frog splash from the top ropes.

Yeah, we’ve all been on the wrong end of that at one time or another.
But that’s ok, because today you’re going to learn exactly what you need to do to take that option completely off the table.
How?
Well, below we’ve collected 5 killer drills for recovering guard from one of the best guard players to ever put on a gi – Mr Paulo Miyao.
And don’t worry about having to memorise a thousand steps…
While there are a number of drills in this article, you will notice a couple of common concepts emerging between them all that will make remembering each drill a heck of a lot easier.
These concepts being…
Cover and Move: Before moving in any way, you need to make sure you have your frames in place at all times to ensure your opponent isn’t gifted with a clear path to passing your guard. But, more often than not, shifting positing on your back will require the removal of your arm or your leg as a frame. This is why the cover and move concept is so important. Before removing a frame, make sure you replace that frame with another.
Reducing Surface Area: The less of your body in contact with the mat, the faster you’ll be able to move. To explain this better, think of two separate objects, one a piece of paper, the other a pencil. Visualise laying the piece of paper down on a table and spinning it with one of your hands. Now, visualise placing a pencil on the table in a vertical position, so that the graphite point is all that makes contact with the table surface, and spin it. Now, which do you think would spin faster. If you guessed the pencil, you’d be correct. Reducing this surface area is the key to fast movements on your back.
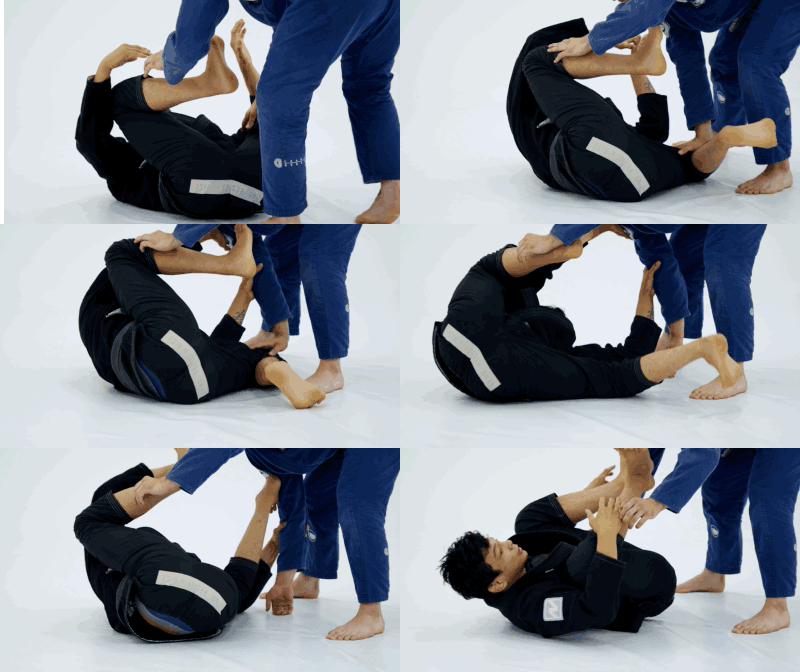
Key point — keep your knees wider than your shoulders and keep your elbows tight on the inside of your knees to maintain your frames.
Hip escape by pushing off your bottom leg – important, never drop your top foot to the mat to help you hip escape as this will open up a space between your knee and elbow and clear a path for your opponent.
After you hit the hip escape movement, pummel your bottom foot to your opponent’s same side bicep.
This will reinforce the frame between your body and your opponent’s via the length of the solid skeletal structure of your shin.
Starting from spider guard, with both feet on the biceps, your training partner is going to circle to one side.
Once they have made this movement, apply pressure with your foot on the same side bicep of the arm in the direction your opponent has moved.
Applying this pressure on their bicep will allow you to lift your hips slightly, reducing the surface area of contact between your back and the mat.
Now that you have raised your hips slightly off the mat, use your foot on their bicep to pull your hips square with your training partner.
Repeat this on both sides.
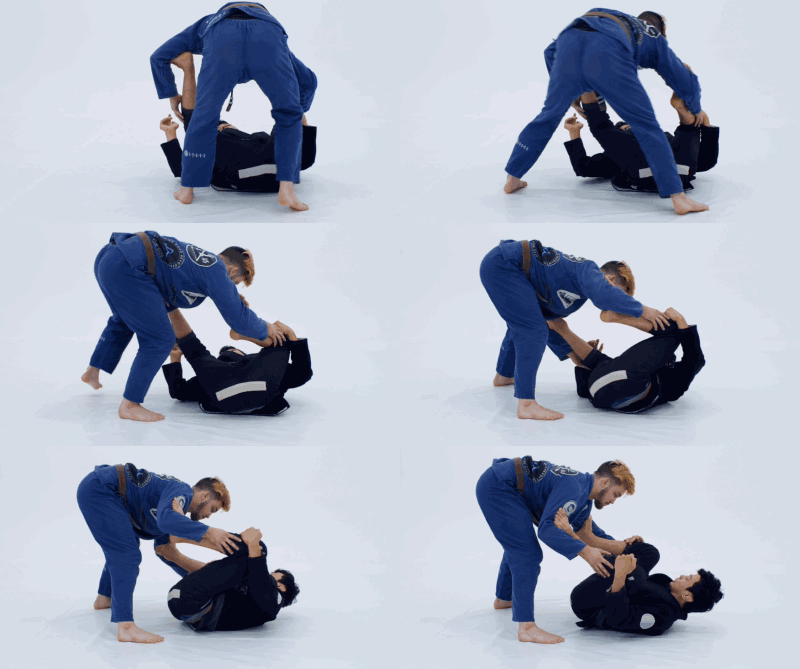
Once you feel comfortable doing this movement, it’s now time for your training partner to circle a full 180° behind your head.
Here, you want to apply the same pressure with your foot on the same side bicep of the direction they are circling.
Once they reach their destination, take a grip on the outside of both of their shins with your hands, cupping behind their calves to ensure they won’t be able to sprawl and drop down to close the distance between their chest and your own.
Now, take your feet off their biceps and place them on their chest. This will also stop them from dropping down to a controlling position.
From here, you’ll notice that placing your feet on your partner’s chest provides you with a greater degree of abdominal flexion, reducing your surface area of contact with the mat.
With this in mind, you are now able to use your feet and your hands on your opponent’s legs to give you a slight push to facilitate a 180° spin.
After the spin, you will be once again square with your partner.
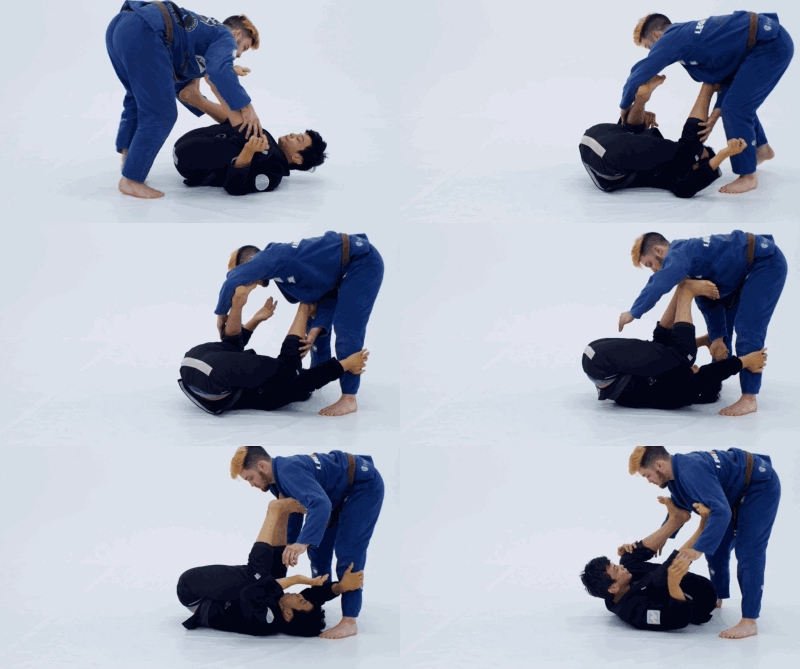
This next drill is for those situations when neither you nor your opponent has grips.
Here, your partner is going to circle around you towards the back of your head where you are going to follow them with your feet and use them to help you spin and square up with your partner.
Key points to note here are the importance of keeping your knees close to your chest and hiding your shins from your opponent.
As your partner circles, you need to follow their chest with the soles of your feet while keeping the tops of your thighs close to your body.
Again, this is super important, as this will help you keep a frame between you and your opponent, blocking them from dropping down to a controlling position, making your shins difficult to grab.
The only thing your opponent needs to be able to push your frames out of place is access to your shins. If they are able to cup them in any way, pushing them down, or to the side, will be effortless and can leave you underneath side control feeling like a chump.

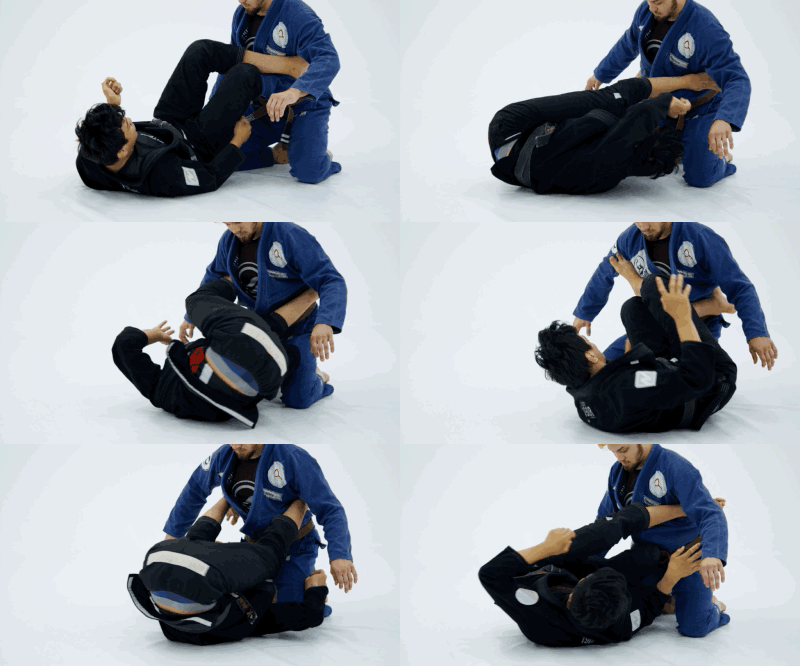
In this drill, we’re going to work on improving your spinning inversions.
While this one may look a little difficult, it’s anything but.
First, starting on your back and your partner on their knees, you’ll need to cross your legs in front of your opponent so that the tops of your feet are hooking at your partner’s ribcage.
To initiate the spin, you’re going to move in the direction of your bottom leg — and always this leg.
As you turn to this side, hip escape out slightly in the opposite direction to help you create an opening for your spin.
Pass your bottom arm now through to the gap between you and your partner and put the back of your palm on the outside of their far knee. This will give you a hook that will greatly help you with the inversion.
Using this grip and your feet to spin your head and shoulders through the gap and to the other side.
Your arms are just as important as your legs are in retaining your guard, and it is important that you get used to using them for more than just pushing your opponent away.
For this drill, you’re going to start with your legs on the outside on one side of your partner’s body.
As you turn to face your partner, take your top leg and place it under their near armpit.
Note: just like in our previous drills, you’ll need to keep your leg close to your chest and your knee wider than your shoulder.
Next, using your bottom foot on the mat, push and hip escape slightly to provide you with an opening for the spin.
From here, place your top hand under your partner’s far armpit and your bottom hand on the outside of their far knee like you did in the previous drill.
Now that your arms are in place, you can now use them to help you spring your head and shoulders through the gap you created by hip escaping at the start of the drill.
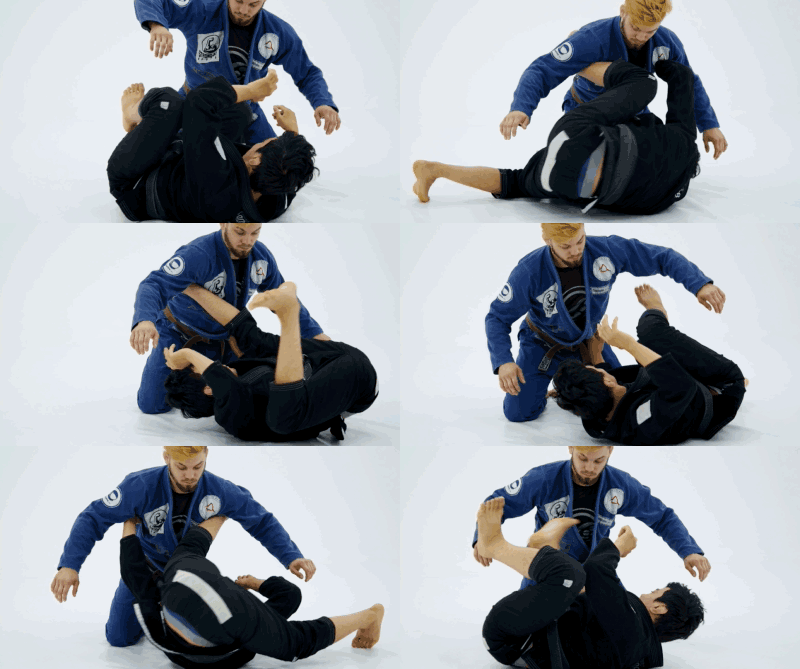
Alrighty, there you have it. 5 killer drills that’ll help you recover guard like an elite black belt. All that’s left for you to do now is put them into action on the mat.
Once you feel comfortable drilling each of these movements individually, you’ll be able to put them together in a form of a flow drill that you and your favorite training partner can do together as a warm-up before class.
Get your partner to walk around you, lightly trying to pass your guard, and see how many times you can mix it up and recover your guard with these drills in a flow.
Now, while this has been an extensive coverage of guard retention, it isn’t everything Paulo has to show you.
There are two more videos in Paulo Miyao’s guard recovery drill sequence in his new course Miyao’s Gambit, a deep dive on his systematic and unconventional submission system from the guard, plus a video of him putting it all together in a flow roll just like he does at training each and every day.
Jiu Jitsu X is on a mission to make learning jiu jitsu online more pleasant and more effective. Transforming your knowledge on the mats.


The BEST way to watch your courses and carry your favorite teachers in your pocket.
All you have to do is subscribe to our newsletter below and we’ll send your copy of the JJX Pressure Passing Cheatsheet straight to your inbox!
Plus, as a member of our newsletter list, you’ll also benefit from even more FREE game-changing content each week, plus handy alerts for all of our incredible discount sales.